Shutter Speed and Camera Shake
- Cliff Smith
- Oct 24, 2018
- 6 min read
Updated: Oct 24, 2020

One mechanism that is common to all types of camera, both film and digital, is the shutter. The shutter is simply a mechanical barrier that prevents light from falling on the film or sensor until it is needed, a means of controlling when and for how long light is allowed in to expose the film or sensor. Even the simplest home-made pin-hole cameras must have something to cover the aperture, while the latest digital cameras have high-speed electro-mechanical shutters capable of timing exposures with an accuracy measured in fractions of a millisecond.
Along with aperture and sensitivity shutter speed is one of the three ways that photographic exposure is controlled. When a picture is taken, the shutter is opened for a precisely measured amount of time allowing light to pass through to the sensor. The duration of the exposure is set either automatically by the camera’s light meter or manually by the photographer. The wider the range of available shutter speeds, the greater the creative versatility of the camera.

Modern digital SLR cameras have a very wide range of shutter speeds available, usually ranging from as slow as 30 seconds to as fast as 1/8,000th of a second, and most also have a ‘B’ setting, in which the shutter stays open for as long as the shutter release is held down. The initial ‘B’ comes from Bulb; very old cameras commonly used an air-bulb attachment as a remote shutter release.
Shutter speed can be manually adjusted in either full manual exposure mode or in shutter priority mode, the latter usually denoted by an ‘S’ or 'Tv' on the exposure mode dial. Shutter priority is a semi-automatic exposure mode in which the photographer sets the desired shutter speed, and the camera’s exposure system adjusts the aperture to produce the correct exposure.

In automatic and program exposure modes the camera will set both the shutter speed and aperture automatically. Under normal daylight conditions, the shutter speed will usually be set to between 1/125th and 1/1000th of a second, since this is fast enough to freeze most movement and to reduce the effects of camera shake. However, in low light conditions the camera may set a slower shutter speed, and with this comes an increased risk of movement blur caused by camera shake. Most cameras will display some sort of warning if this occurs.
Avoiding camera shake
Blurring caused by camera shake ruins more shots than almost any other cause. If you’re shooting hand-held and wish to avoid camera shake, as a rule of thumb you can safely use a shutter speed roughly equivalent to the reciprocal of the focal length you are using. For example, if you’re using a 100mm focal length then you can take a sharp hand-held shot at a shutter speed of 1/100th of a second or faster. If you’re using a 35mm focal length then 1/35th of a second is safe, and so on.
Here's an example shot taken hand-held at a focal length of 50mm and a shutter speed of 1/50th of a second. As you can see it’s sharp and shake free.

Here's the same hand-held shot but this time with a shutter speed of 1/10th of a second. At this speed it’s virtually impossible to hold the camera steady enough for a shake-free shot. As you can see, the result is badly blurred.

Many modern cameras now include technology which can help reduce the effects of camera shake at low shutter speeds. Many compact cameras and mobile phones use electronic processing to counteract movement, which does work but produces relatively poor image quality. Among digital SLR and CSC manufacturers there are two types of image stabilisation in common use. Canon, Nikon and Panasonic favour optical stabilisation, where elements within the camera lens are moved to counteract camera shake. Other brands including Pentax and Sony employ a system which moves the camera’s sensor to achieve the same effect.
There is no clear advantage in performance between moving-lens and moving-sensor systems. Modern image stabilisation systems of both types can provide around three or four stops of additional stability, however the sensor-shift method has an advantage for SLR users because the non-stabilised lenses are usually considerably lighter and are often also cheaper to buy, since the complex anti-shake system is built into the camera body. It also means that photographers using older pre-digital lenses can still have the advantage of image stabilisation.
This next example shot was taken with a focal length of 50mm at 1/10th of a second as before, but this time the image stabilisation (in this case a sensor-shift system) is switched on. It has detected the vibration and corrected it by moving the sensor to compensate, resulting in a much sharper shot.

Motion blur
Any movement in the frame during the exposure will be captured in the picture, resulting in motion blur. Anti-shake systems can do nothing to correct this; the only solution is to use a shutter speed fast enough to effectively freeze the action.
With a fast shutter speed you can freeze even very fast-moving objects, as this next sequence of photos will show. They were taken at shutter speeds ranging from 1/100th to 1/8000th of a second.


As you can see, at 1/8000th of a second even the spinning propeller of an aircraft is completely frozen.
Panning shots
Freezing the action with a fast shutter speed produces a nice sharp image, but sometimes you might want to allow a controlled amount of movement blur to show that the subject was in motion. There are a number of ways to accomplish this.
In this first example, the camera was fixed on a tripod, with a shutter speed of 1/250th of a second, while the subject cycled past in front of the lens. The tripod ensures that the background is sharp and the fast shutter speed has frozen the movement. The result is sharp but looks slightly unnatural, as though the cyclist was somehow balancing there without moving.

With the camera still mounted on the tripod, the shutter speed was set to 1/10th of a second, and the subject went around for another go. This time the background is still sharp, but the slow shutter speed has resulted in lots of movement blur, making the subject almost unrecognisable.

In order to capture the feeling of movement, the best technique is to use a slow shutter speed, but to pan the camera (move it side-to-side) to follow the moving subject as you press the shutter. It is a technique that requires practice, since you need to be able to keep the camera moving smoothly as the exposure is taken and avoid up-and-down movement as you press the shutter. It may take several tries to get it right, but when it works the results are very effective, with the subject stationary against a movement-blurred background. This example shot was taken hand-held at a shutter speed of 1/10th of a second. Some cameras have a setting on the image stabilisation system to correct vertical movement but not horizontal, which helps with this kind of shot.

The waterfall effect
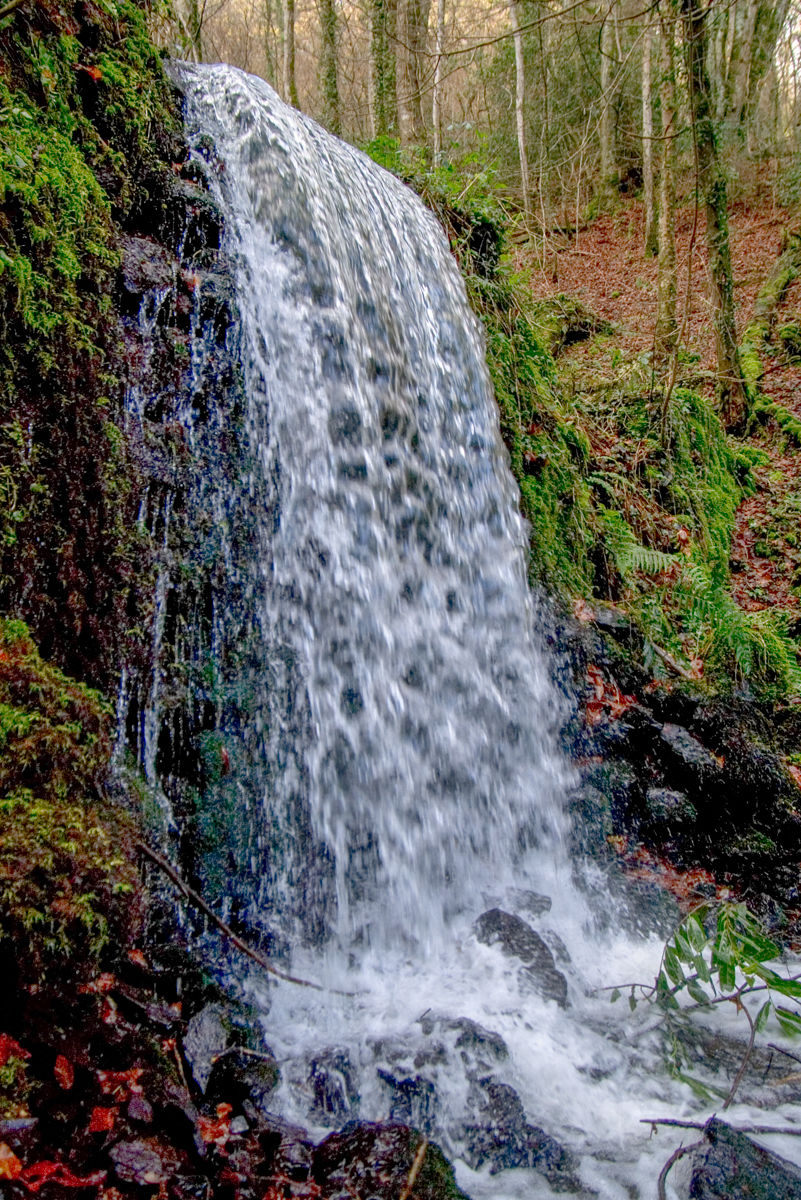
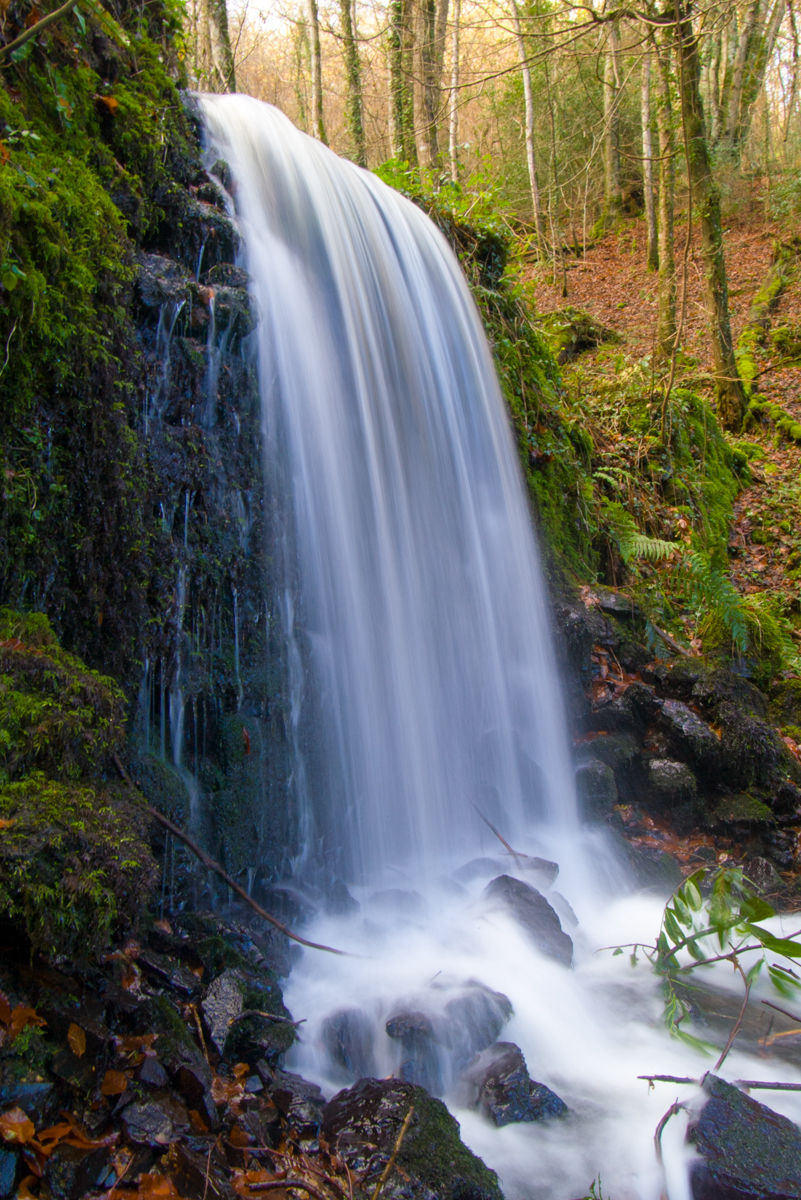
One of the most effective uses of long shutter speed is photographing flowing water. It’s a beautiful if slightly over-used effect, but it is very easy to achieve. Any waterfall or fast-flowing stream will do, as long as it has white splashing water. This one is at Canonteign Falls Park near Chudleigh in Devon.
If you just point the camera and shoot on automatic, you’ll end up with something like this. It looks nice enough, but it’s a bit dull. This example was shot on at a shutter speed of 1/180th of a second and an aperture of f4.

Fixing the camera on a tripod eliminates camera shake. With the camera set on shutter priority mode select the slowest shutter speed you can; anything over about half a second will work. This second example was taken from the same position as the previous shot, but with a shutter speed of half a second and an aperture of f22.

Fireworks
One way to take good fireworks photos is to set your camera on a tripod some distance from the display, with the zoom set to a very wide angle. Set a shutter speed of 2 seconds and as wide an aperture as you can manage. Getting the framing exactly right is simply a matter of luck, timing, and then cropping the photo later.

Car lights at night
Another interesting effect achieved using long shutter speeds is streaking car lights at night. This example was taken from a footbridge overlooking a busy junction on the A30, a major road between Exeter and Plymouth. The camera was set up on a tripod, using manual focus and full manual exposure, with a cable shutter release. With the aperture set to f3.5, several shots were taken at different shutter speeds, starting at 4 seconds and increasing by 2 seconds per shot. Bracketing exposures like this is the best way to ensure a good result. This shot proved to be the best of the lot, taken at a shutter speed of 10 seconds.
When shooting near heavy traffic at night it’s obviously important to stay safe. Wear something bright and reflective, and don’t get too close to the road. Also, never use a flash when taking photos of traffic. You could dazzle a driver and cause an accident.


Comentários