


Understanding Aperture and Depth of Field
- Cliff Smith
- Oct 18, 2018
- 6 min read


Introduction
Of the three basic controls common to all cameras – shutter speed, focus and aperture – it is the latter, the aperture adjustment, that is the least well understood. This is because it not only helps to control exposure, but also affects something called Depth of Field. It can also have an effect on the quality of the image, emphasising or concealing optical flaws in the lens. Understanding the effects of aperture size on the finished image is a vital skill for any keen photographer.
There's nothing mysterious about the name aperture; it is literally a hole through which light passes after it enters the lens. The diameter of this hole can be altered, allowing a greater or smaller amount of light to pass through on its way to the sensor. Back in the early days of photography the aperture was adjusted by slotting cards with different sized holes cut in them into the body of the camera behind the lens. These cards were known as “stops”, and this is still part of photographic terminology today. On modern cameras the aperture is controlled by a clever arrangement of curved shutters inside the lens body that move to produce a continuously variable aperture, but the settings are usually still referred to as “F-stops”.


Aperture adjustment is used in combination with the shutter speed and ISO sensitivity to control photographic exposure. However, it is also the primary means of controlling something called depth of field, a concept that may need a bit of explanation.
If you take a photo of a subject at a distance of about 3 metres with standard zoom lens, in good light with the focal length set to about 30mm, as long as the lens is focused correctly the subject should appear nice and sharp in the image. However, you’ll usually find that objects about 1.5m in front of the subject, and for about 4 or 5 metres behind the subject, also appear sharp. This distance, from the closest point of acceptable sharpness to the most distant, is known as the depth of field.
By altering the size of the aperture, it is possible to control the extent of this depth of field, either reducing it so that only the main subject is in sharp focus or expanding it so that an entire landscape can appear to be just as sharp.
If you have an older camera sitting at the back of your cupboard, such as that manual film SLR from the 1980s that you haven't used in years but can't bear to part with, dig it out and have a look at the lens. It will have a ring for controlling the aperture setting, labelled with numbers usually from about F2 to about F22. Now take a look at the focus control ring. It will have distances usually calibrated in feet and metres, and alongside it you’ll usually find lines marked with the same numbers as the aperture ring, arranged in pairs either side of the focal distance mark with the larger numbers toward the outside.
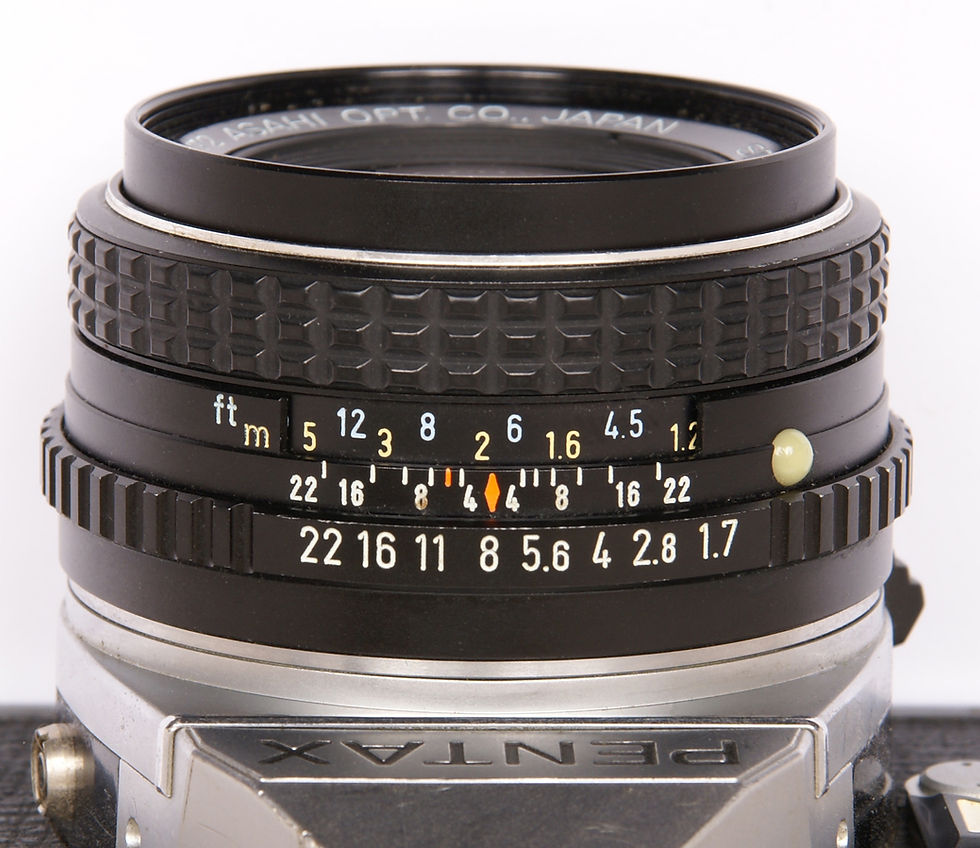
The purpose of this aperture scale is to help estimate the depth of field at a particular distance for any given aperture setting; with the focus set to a particular distance, anything between the two lines for the selected aperture setting should be acceptably sharp. Some older zoom lenses have a series of curved lines etched into the lens barrel for the same purpose. For some reason this scale is missing from most modern auto-focus, auto-aperture lenses, which is a shame because it makes the whole concept of depth of field much easier to understand.
How aperture works
Explaining exactly why altering the size of the lens aperture alters the depth of field is a little complicated, but a few simple diagrams should help to shed some light on the matter. For a start, let's clear up some popular misconceptions about the difference between focus and sharpness.

This is a highly simplified diagram of the arrangement of lens, aperture and sensor inside a modern digital camera. In this first diagram, three subjects at different distances from the camera lens are represented by the red, green and blue dots. The lens is focused on the green spot, so light from it passes through the aperture and the lens and appears sharply focused on the sensor. Light from the red and blue spots also passes through the aperture and lens, but light from the red spot focuses a short distance in front of the CCD, while light from the blue spot focuses a short distance behind it. The light from these other spots still hits the CCD, but due to light scattering it is unfocused and spread over a wide area.
What this means is that the red and blue spots will appear as large blurred spots on the final image, while the green spot will be sharp and in focus. The size of the blurred area of the red and blue spots is called the “circle of confusion.”

This diagram shows the same arrangement of camera and subjects, and the coloured spots are the same distance from the lens, but this time the aperture has been reduced to just a small hole. Again, the lens is focused on the green spot, and the red and blue spots are out of focus. However, the narrow aperture restricts the light scattering and the relative angles of the light paths, and as a result the “circles of confusion” are much smaller. This makes the red and blue spots in the final image appear much sharper. They are still out of focus, but the effect is not so noticeable. To make circles of confusion as large as in the first image, the red and blue spots would have to be much further away from the green one.
Focal Length and Depth of Field
The focal length of your lens, in other words how much you zoom in on your subject, also has a large effect on depth of field. Short focal lengths have much greater depth of field that longer focal lengths. This is one reason why, when taking a portrait shot, it’s a good idea to step back a bit and zoom in rather than using a wide-angle lens up close.
The easiest way to demonstrate the effect of changing depth of field is with some example shots. In the following series of photos, the camera was focused on the railing with the red ribbon tied to it. It is approximately three metres from the camera. The railings are about 12cm apart.

This shot was taken using a standard 50mm lens set to an aperture of f1.7. As you can see the railing with the ribbon is nice and sharp, as are the two in front of it and the three behind, but outside of that zone the railings become progressively more blurred. In other words, at f1.7, with a focal length of 50mm and a distance of 3m, the depth of field is approximately 60cm.

By reducing the aperture by just over four stops to f8, the depth of field is increased to about 120cm. Now the four railings in front of the subject and the six behind are acceptably sharp.

Reducing the aperture to its smallest setting of f22 maximises the depth of field. In this shot everything looks sharp, even the railings closest to the camera, and further away objects out to infinity are also sharp. This is why landscape photographers usually use very small aperture settings.
Practical Uses for Depth of Field
There are several situations where controlling depth of field is important. The most common is portrait photography. Portraits shot on an automatic camera using a medium aperture usually have a lot of sharp foreground and background detail, which can distract attention away from the main subject.

As you can see in this shot, which was taken using an aperture of f/22, the model is in focus, but so is the background, which unfortunately makes it look like she has a tree growing out of the top of head.

By increasing the aperture to f/5.6, only the subject is in now in sharp focus. A blurred background is much less distracting, and concentrates the viewers’ attention on the subject, making them really stand out from the background.
Another situation in which depth of field is an important issue is landscape photography. Here it is often important to maximise depth of field, so it is usual to use a small aperture. This shot was taken using an aperture of f/22, to ensure that both the foreground and distant background are in focus. It also uses something called hyperfocal distance, but that's a subject we'll cover in a future tutorial.


Comments